webpack 性能优化
开启 sourcemap
配置 devtool 为 sourcemap 快熟定位错误代码源文件
module.exports = {
  // 生产环境是否开启,根据具体需要,一把如果有监控系统,建议开启
  devtool: 'source-map',
};
这样入口 index.js 就会生产同样的映射关系文件 index.js.map
具体配置参考:https://webpack.docschina.org/configuration/devtool/#devtool
使用 webpack-dev-server 服务
提高本地开发效率:热更新,本地数据 mock
配置 package.json 使用 webpack-dev-server
{
  "scripts": {
    "serve": "webpack-dev-server"
  }
}
然后在 wepack.config.js 配置
module.exports = {
  devServer: {
    port: 8081, // 端口
    open: true, // 自动打开浏览器
  },
};
本地数据 mock 测试,安装 express 和 axois
npm i -D express axios新建根目录文件 server.js, 执行 node server.js 开启服务端
const express = require('express');
const app = express();

app.get('/api/info', (req, res) => {
  res.json({
    name: 'webpack',
  });
});

app.listen('8090');
在入口 index.js 中测试
import axios from 'axios';

axios.get('/api/info').then((res) => {
  console.log(res);
});
此时会报错,还需要配置代理访问,在 wepack.config.js 配置
module.exports = {
  devServer: {
    proxy: {
      // 代理访问
      '/api': {
        target: 'http://localhost:8090/',
      },
    },
  },
};
babel 工具
用于编译 js 的,默认支持 js, json 模块,对于目标浏览器,我们需要转换:
flow -> js
jsx -> js
ts -> js
es6+ -> js
那么走起,首先安装 babel 工具
npm i -D babel-loader @babel/core @babel/preset-env @babel/polyfill core-jsbabel v7 之后,都是以
@babel开头的仓库@babel/preset-env只做语法转换,es6+ -> es5@babel/polyfill包含 ecma 新特性的库,可以使旧浏览器支持原生较新的功能
在 wepack.config.js 配置使用
module.exports = {
  module: {
    rules: [
      {
        test: /\.js$/,
        use: {
          loader: 'babel-loader',
          options: {
            presets: ['@babel/preset-env'],
          },
        },
      },
    ],
  },
};
使用 polyfill 垫片
比如在入口文件 index.js 添加
import '@babel/polyfill'; // require("@babel/polyfill");从 Babel 7.4.0 开始直接包含
core-js/stable(以 polyfill ECMAScript 功能)和regenerator-runtime/runtime(需要使用转译的生成器函数)
import 'core-js/stable';
import 'regenerator-runtime/runtime';
配置 polyfill 按需加载
目前还是推荐使用
@babel/polyfill+core-js 2.x,core-js 3.x新功能暂时用不上,引入太大
在 wepack.config.js 配置使用
module.exports = {
  module: {
    rules: [
      {
        test: /\.js$/,
        use: {
          loader: 'babel-loader',
          options: {
            presets: [
              [
                '@babel/preset-env', // 只做语法转换,es6+ -> es5
                {
                  targets: {
                    // 类似 browserslist 可以写成  "targets": "> 0.25%, not dead"
                    edge: '17',
                    firefox: '60',
                    chrome: '67',
                    safari: '11',
                  },
                  corejs: 2, // 新版本需要指定核心库版本,3.x 版本太大了
                  useBuiltIns: 'usage', // 按需加载 entry/usage/false
                },
              ],
            ],
          },
        },
      },
    ],
  },
};
useBuiltIns 选项时 babel 7 的新功能,这个选项告诉 babel 如何配置 @babel/polyfill
entry在 webpack 入口文件import "@babel/polyfill"一次,babel 会根据你的使用情况导入polyfill垫片,没有使用的功能不会导入usage不需要引入,全自动检测,还是需要安装@babel/polyfillfalse使用import "@babel/polyfill"会全部加载(不推荐)
以上配合导致配置文件越来越长,可以根目录新建 .babelrc (或 babel.config.js)文件,把上面的 options 配置放进来
{
  "presets": [
    [
      '@babel/preset-env',
      // 只做语法转换,es6+ -> es5
      {
        "targets": {
          // 类似 browserslist 可以写成  "targets": "> 0.25%, not dead"
          "edge": '17',
          "firefox": '60',
          "chrome": '67',
          "safari": '11'
        },
        "corejs": 2,
        // 新版本需要指定核心库版本,3.x 版本太大了
        "useBuiltIns": 'usage'
        // 按需加载 entry/usage/false
      }
    ]
  ]
}
配置文件 wepack.config.js 就简化了
module.exports = {
  module: {
    rules: [
      {
        test: /\.js$/,
        use: {
          loader: 'babel-loader',
        },
      },
    ],
  },
};
这样的效果一样的
集成 react 框架
首先安装 react 框架和依赖
npm i -D react react-dom @babel/preset-react在 .babelrc 中配置
{
  "presets": ["@babel/preset-react"]
}
入口文件 index.js 测试代码
import React, { Component } from 'react';
import ReactDom from 'react-dom';

class App extends Component {
  render() {
    return <div> helle world </div>;
  }
}

ReactDom.render(<App />, document.getElementById('app'));
运行 npm run dev,打开 /dist/index.html 显示 hello world
如果像集成 vuejs 可以参考: https://vue-loader.vuejs.org/zh/guide/
如何编写一个 plugin
webpack 生命周期概念
-> 启动 webpack -> 读取配置(A 插件告知 webpack 运行到哪个阶段触发 A)
在入口 index.js 中放入一段代码
const webpack = require('webpack');
const options = require('../webpack.config');
const compiler = webpack(options); // compiler.hooks

Object.keys(compiler.hooks).forEach((hookName) => {
  if (compiler.hooks[hookName].tap) {
    compiler.hooks[hookName].tap('anyString', () => {
      console.log(`run -> ${hookName}`);
    });
  }
});

compiler.run();
执行 node ./src/index.js 打印出 webpack 所有的生命钩子
D:\www\codepress\webpack>node ./src/index.js
run -> beforeRun
run -> run
run -> normalModuleFactory
run -> contextModuleFactory
run -> beforeCompile
run -> compile
run -> thisCompilation
run -> compilation
run -> make
run -> normalModuleFactory
run -> contextModuleFactory
run -> beforeCompile
run -> compilation
run -> finishMake
run -> afterCompile
[BABEL] Note: The code generator has deoptimised the styling of D:\www\codepress\webpack\node_modules\lodash\lodash.js as it exceeds the max
 of 500KB.
[BABEL] Note: The code generator has deoptimised the styling of D:\www\codepress\webpack\node_modules\terser\dist\bundle.min.js as it exceed
s the max of 500KB.
run -> finishMake
run -> afterCompile
run -> shouldEmit
run -> emit
run -> assetEmitted
run -> assetEmitted
run -> assetEmitted
run -> afterEmit
run -> done
run -> afterDone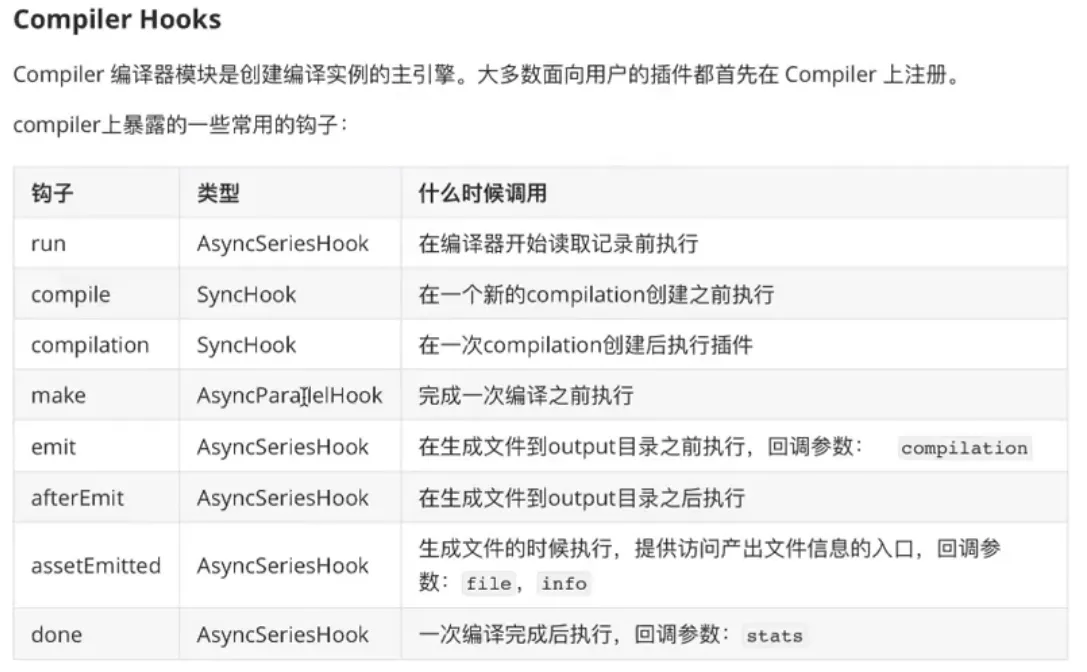
完整参考:https://webpack.docschina.org/api/compiler-hooks/#hooks
根目录新建 myPlugins/txt-webpack-plugin.js 插件文件,编写插件内容
// 插件的结构
module.exports = class texWebpackPlugin {
  // apply
  apply(compiler) {
    // 钩入 hooks

    // 异步钩子使用 tapAsync
    compiler.hooks.emit.tapAsync('texWebpackPlugin', (compilation, cb) => {
      // console.log(compilation.assets)

      compilation.assets['lzw.txt'] = {
        source: function () {
          return 'hello lzw.';
        },
        size: function () {
          return 1024;
        },
      };
      cb();
    });

    // 同步钩子使用 tap, 没有 cb 了
    compiler.hooks.compile.tap('texWebpackPlugin', (compilation) => {
      console.log(compilation);
    });
  }
};
然后就可以在 wepack.config.js 中使用
const texWebpackPlugin = require('./myPlugins/txt-webpack-plugin');

module.exports = {
  plugins: [new texWebpackPlugin()],
};
运行 npm run dev,结果会生成 /dist/lzw.txt 文件